Rover V8 section
Rebuilding the V8 was very straightforward. It is a simple enough engine and has lots of torque as standard, although the tuning potential of the beast is widely accepted as phenomenal. I chose to stay fairly standard for a few reasons:1) Budget;
2) I wasn't changing the gearbox and didn't want to strain it unduly;
3) I had a fibreglass car and an engine that pulled cars twice as heavy admirably;
4) I didn't know if I was going to like the new feel of the car. (There's no point in spending thousands on a new engine if all you're going to do is be disappointed by it.)
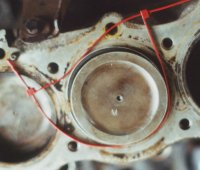
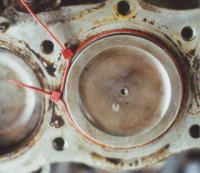
All 'consumables' were replaced (i.e. gaskets, white metal bearings, bolts etc.) and everything else was cleaned, checked and re-used. Actually that's not quite true - there are two 'consumables' (piston rings) that had to be resurrected due to me snapping the new ones. Oh well, 22 out of 24 ain't bad. Below are two pictures that show you how to do it if you don't have the proper ring squidger(!)
So far the engine was just a rebuilt V8 - now came the fun part - making it fit to a Lotus car and gear train. Bearing in mind that I used the original Lotus gearbox (so everything rear of the bell housing was Lotus) the main problems were engine mountings, spigot bearing, getting the Lotus clutch cover plate, driven plate and release bearing to work with a Rover flywheel and the bell housing adapter.
If that seems confusing, here's a description of my set up:
Lotus prop shaft joins to Lotus gear box;
Lotus gear box has modified Rover bell housing - adapter plate mates Lotus 'box to Rover housing;
Rover housing joins to Rover V8 engine;
Rover engine uses Rover flywheel;
Rover flywheel is professionally machined to take Lotus clutch cover;
Lotus (competition) clutch friction/driven plate, release bearing and arm can then be used with Lotus gear box while attached to Rover flywheel and engine.
Flywheel
I did make enquiries regarding lightening the flywheel - basically this allows for quicker pick up from standing or when accelerating in a low gear.
If an engine with a really heavy flywheel is idling in neutral and you put your foot down to rev it, it takes a good few seconds to speed up because all the power of the engine is going into accelerating the flywheel. The engine is producing full power - it's just that most of it is going into accelerating the flywheel, not the car. If you lighten the flywheel there is less inertia required to accelerate the (lighter) flywheel so the engine produces full power more quickly - even if you don't change anything else about the engine! So with the same power, you've gone faster because 'rotational inertia' has a massive effect, especially at high revs; and in low gears, the effect gets multiplied up by the gear ratio. Since the Eclat is a whole lot lighter than a Rover SD1 you can expect a lighter flywheel to make a useful difference (the lighter the car, the more significant the flywheel). Reducing the flywheel inertia is just like lightening the car - it would be Colin's way!
The down side is that the flywheel is then less substantial and therefore less likely to last as long. I have seen a racing Escort flywheel that was literally a 'Y' piece inside a hollow 1/2" circle. It's life expectancy was a few thousand miles - at BEST! Basically it's a trade off: the more weight you lose, the bigger the effect, but the weaker the flywheel. I was advised that to maintain reliability I could only realistically shave a maximum of 2 lbs off a 24 lb flywheel and, for the extra expense against improved power and loss of strength, decided against it.
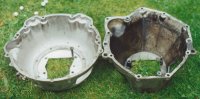
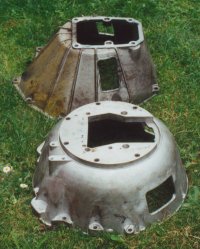
Bell Housing
If you have to make one of these yourself, you're in for a long hard slog. I was exceptionally fortunate in that I found a chap who had once intended to market V8 conversion kits and had a bell housing left over. Otherwise your best bet is to get hold of an old Rover V8 housing (or two!) and cut holes in it. As long as the bell housing isn't significantly weakened, you can pretty much cut holes where you want; basically you need the clutch arm to protrude and have enough clearance to move backwards and forwards - it's not actually that difficult.
The adapter plate is a bit more tricky as it needs to mate the Rover housing with the Lotus 'box (obviously if you're changing the gear box as well this is not an issue). Accurate measuring is essential so that the bolts - and in particular the clutch pivot bolt - and holes all line up. The plate needs to be about 5/8" thick
Spigot Bearing
Tragically, this little beastie held a certain fascination for me as I'd heard of it but never seen one and hadn't a clue what it did. Just to prove I learned something, I'll explain: it sits in the crank and retains the end of the gearbox output shaft, preventing too much side-to-side movement and allowing smooth rotation.
The bearing requires a bit of work as the Lotus gear box output shaft is larger than the Rover one. Bear in mind that I used the Rover Crank in the Rover engine, so the external diameter of the spigot bearing has to fit the Rover crank, whilst the internal diameter has to accept the Lotus shaft.
The easiest way of doing this is to get the Rover spigot bearing and gently drill out the internal diameter until it accepts the Lotus shaft. It's only bronze oilite and is fairly soft - just remember to clean all the swarf off with white spirit and soak it in oil afterwards! The Lotus shaft should fit snugly, athough the bearing does not take a huge amount of side load.
Back to Top | Back to restoration index | Page 1 | Page 5 | Page 7